Instrumentating apps for fun and profit
Frida #
Frida is my favourite tool to manipulate code and memory inside processes. However, I find no tutorial which teaches frida for absolute beginners/intermediate programmers. Although there are alternatives for frida on PC (Linux/Windows), I find no good alternative to frida on Android. Anyway, this would be a fun tutorial!
Introduction #
To start, we can obtain frida through pip:
pip install frida frida-tools
The package frida comes with the tool frida and its Python API.
python -c "import frida;"
The above snippet should work fine.
Let’s discuss about the functionality frida offers, by looking at its help:
output of: frida -h
$ frida -h
usage: frida [options] target

positional arguments:
  args                  extra arguments and/or target

options:
  -h, --help            show this help message and exit
  -D ID, --device ID    connect to device with the given ID
  -U, --usb             connect to USB device
  -R, --remote          connect to remote frida-server
  -H HOST, --host HOST  connect to remote frida-server on HOST
  --certificate CERTIFICATE
                        speak TLS with HOST, expecting CERTIFICATE
  --origin ORIGIN       connect to remote server with “Origin” header set to ORIGIN
  --token TOKEN         authenticate with HOST using TOKEN
  --keepalive-interval INTERVAL
                        set keepalive interval in seconds, or 0 to disable (defaults to -1 to auto-select based on transport)
  --p2p                 establish a peer-to-peer connection with target
  --stun-server ADDRESS
                        set STUN server ADDRESS to use with --p2p
  --relay address,username,password,turn-{udp,tcp,tls}
                        add relay to use with --p2p
  -f TARGET, --file TARGET
                        spawn FILE
  -F, --attach-frontmost
                        attach to frontmost application
  -n NAME, --attach-name NAME
                        attach to NAME
  -N IDENTIFIER, --attach-identifier IDENTIFIER
                        attach to IDENTIFIER
  -p PID, --attach-pid PID
                        attach to PID
  -W PATTERN, --await PATTERN
                        await spawn matching PATTERN
  --stdio {inherit,pipe}
                        stdio behavior when spawning (defaults to “inherit”)
  --aux option          set aux option when spawning, such as “uid=(int)42” (supported types are: string, bool, int)
  --realm {native,emulated}
                        realm to attach in
  --runtime {qjs,v8}    script runtime to use
  --debug               enable the Node.js compatible script debugger
  --squelch-crash       if enabled, will not dump crash report to console
  -O FILE, --options-file FILE
                        text file containing additional command line options
  --version             show program's version number and exit
  -l SCRIPT, --load SCRIPT
                        load SCRIPT
  -P PARAMETERS_JSON, --parameters PARAMETERS_JSON
                        parameters as JSON, same as Gadget
  -C USER_CMODULE, --cmodule USER_CMODULE
                        load CMODULE
  --toolchain {any,internal,external}
                        CModule toolchain to use when compiling from source code
  -c CODESHARE_URI, --codeshare CODESHARE_URI
                        load CODESHARE_URI
  -e CODE, --eval CODE  evaluate CODE
  -q                    quiet mode (no prompt) and quit after -l and -e
  -t TIMEOUT, --timeout TIMEOUT
                        seconds to wait before terminating in quiet mode
  --pause               leave main thread paused after spawning program
  -o LOGFILE, --output LOGFILE
                        output to log file
  --eternalize          eternalize the script before exit
  --exit-on-error       exit with code 1 after encountering any exception in the SCRIPT
  --kill-on-exit        kill the spawned program when Frida exits
  --auto-perform        wrap entered code with Java.perform
  --auto-reload         Enable auto reload of provided scripts and c module (on by default, will be required in the future)
  --no-auto-reload      Disable auto reload of provided scripts and c module
But we will only need the following:
frida -f <path/to/file> # spawn file
frida -U <usb> # USB (ADB/android)
frida -p <PID> # attach to PID
frida -l agent.js # frida script
And frida-tools comes with the following tools:
- frida-apk
- frida-compile
- frida-trace
- frida-itrace
- frida-join
- frida-kill
- frida-ls-devices
- frida-ps
- frida-pull
- frida-push
- frida-rm
- frida-trace: which is, very, very useful for tracing specific functions
How does frida work? #
Frida works by injecting a frida-agent.dll into the target process.
The agent then communicates with the server and facilitates scripts written in Javascript to load using QuickJS.
QuickJS is quoted from its makers as: QuickJS homepage
- QuickJS is a small and embeddable Javascript engine.
- It supports the ES2023 specification including modules, asynchronous generators, proxies and BigInt.
- Small and easily embeddable: just a few C files, no external dependency, 210 KiB of x86 code for a simple hello world program.
- Small built-in standard library with C library wrappers.
It is appreciable that frida supports basic Data structures has functions to perform DSA:
Let’s get started.
Attaching to a process #
Frida is not a debugger. It is a tool for instrumenting binaries.
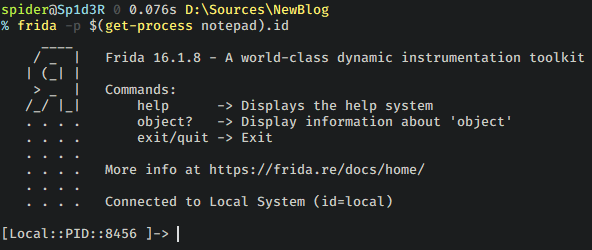
Let’s attach frida to a notepad process and observe how it behaves. I am using Windows 11 and Powershell throughout the tutorial.
% notepad
% frida -p $(get-process notepad).id # automatically attach to the first notepad process
Let’s observe the process modules using process hacker.
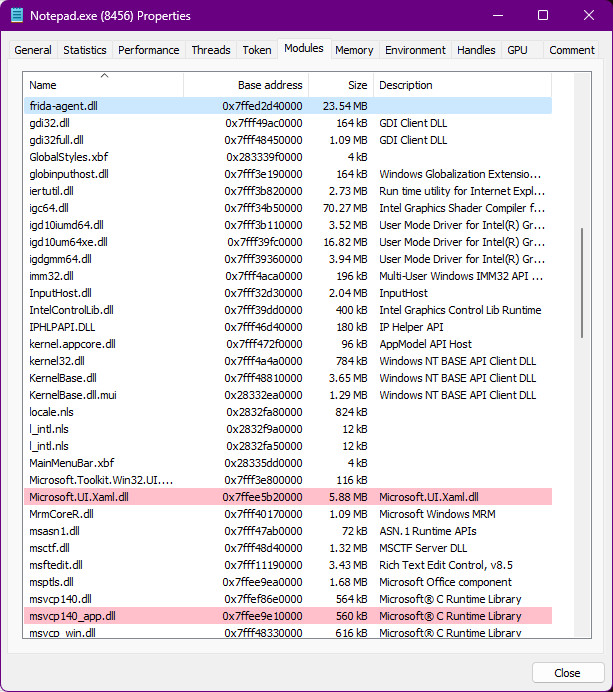
Awesome! We have the DLL frida-agent.dll injected into the process and have the following console:
Awesome! We can use the console to invoke various Javascript APIs. They are documented here.
For now, let’s enumerate all the loaded modules using Process.enumerateModules(). From the documentation, we have:
Process.enumerateModules(): enumerates modules loaded right now, returning an array of Module objects.
- The first object of the returned array of Module objects is the actual program.
Let’s observe how the Module objects look like:

So, a module object is basically:
{
    "base": "base address of module",
    "name": "name of module",
    "path": "full path to module",
    "size": "size of the module on memory"
}